Wednesday, April 27, 2011

Choose fabric is hard sometimes


I finally picked out a fabric for 6621.  It is something that has been in my stash for a very long while, and I was edging towards getting rid of it, but I think it will work for this short.  And if it doesn’t or if the pattern doesn’t quite work out, then no loss, because I was planning on getting rid of it anyway.

It is a ‘silk’ sari I bought on ebay ages and ages ago.  I never bothered to do a burn test, but I think it is polyester.  I like the iridescence, and this photo shows the two colors pretty well.  I am not going to use the borders in the shirt, but I will save them in case another project pops into my head.

I had a really hard time picking out a pattern, because I wanted something soft and drape-y and the fabrics I can find that have the right textures are all busy prints.  I want something simple, a solid, stripe, or polka dot.  A very simple floral could work, but it would have to be *very* simple.  The only fabric I found that I really loved was cream with black polka dots.  That would be fine, except for one thing.  

Here is a photo of the shirt I already have in this style:


I don’t think I need 2 nearly identical shirts.  I already have a coworker who comments on how much purple I wear.  I certainly don’t need to begin a wardrobe of shirts with such slight variations that it looks like I am wearing a uniform.

Saturday, April 23, 2011

In which I actually did something instead of just thinking about it.

I started making the pattern alterations to 6621.  I decided to cut the size 14 and add a bit where needed instead of cutting the size 16 and taking a bunch out.  he good news is that with some tissue fitting I figured out that I won't need to alter the sleeve opening, since is fits as it is designed.  I am comparing the pattern a RTW shirt that I love that is a very similar style.  So far I ave added an inch to the length of the top front, and inch to the length of the bottom front, 1/4 inch at the side front bottom (hips space, you know), and straightened out the ugly (in my opinion) curved button placket.  I tried to take pictures, but since I am making my alterations in pencil on newsprint paper, I can't get it to show up on camera. 

I still need to make the changes to the back piece and the front band, then I should be able to sew up a quick muslin and check the fit. I have a feeling I will need to add a bit more at the hips and maybe a touch more length, since most  big 3 patterns are drafted way too short for me.

I probably could ave gotten more done, but I decided that I desperately needed to paint my nails...

Friday, April 22, 2011

The plan?

I haven't been feeling very well all week, so I haven't gotten much done.  This weekend I hope to get started on New Look 6621.  My plan is to make view B with the view D collar. Here is the short list of the alteration I know I will need to make:

  • straighten the button placket
  • lengthen the shoulder to underbust piece
  • lengthen the underbust to hips
  • remove some of what I think is excess ease based on the finished measurements listed on the envelope
There are a few other alterations that I think will likely be needed, but I need to do a muslin to figure those out.

Pretty nail polish.  Ignore the cuticles.  They don't seem to look that bad in read life.

Thursday, April 21, 2011

Velvet Bodice: part II

 What I don’t like:

Apparently, it took me a long time to figure out that you could put something other than black thread in the bobbin.  Also, this is still when I was learning to use my mom’s old sewing machine, which even on it best day was temperamental, hence all the rat’s nests of thread.  In my defense, though, even when I had learned to use a sewing machine well, this machine gave me trouble.  It just wasn’t very stable.

These grommets were horrible, but I don't think it was a result of my skill.  I just bought cheap grommets because I didn't know any better.

I didn’t do a very good job on the bias binding at the front opening.  I think this was just a function of not realizing that I didn’t have to have a right angle at the end of the binding, and for some reason I didn’t sew the bias strip I made for the straps closed.  It has never come unfolded while I was wearing it, it just seems a bit odd for it to be open, you know?
 The wrap-up:
This bodice just isn’t my style, and honestly it wasn’t really my style when I made it, but it was an early example of a problem I have had throughout my sewing career.  I was never happy with this piece, no matter how I styled it.  I let an interesting fabric throw me off course.  I liked the fabric so I came up with a plan to use it and ended up with a costume that I liked, but ideally on someone else. 

Now when I see fabric I try to ask myself “Can I see myself actually wearing this?”.  Often the answer is no, which can help me resist it.  Right now I am in the process of going through my fabric stash and asking that question about everything I already own.  For instance, I have a couple of sari that I bought off of ebay years ago.  I think they are so pretty, but I don’t see myself wearing anything made out of them and they don’t match my home décor style, either.  They are lovely, but at this point they are just taking up space.


Wednesday, April 20, 2011

Velvet Bodice: part I


I figured it was about time to go back and look at another old project.  I don’t have any pictures of me wearing this as it is now a good bit too big, and I can’t find a decent picture from when it did fit. 

I think I made this the Halloween before I made the silver and black corset.  I wanted to try making a corset and I had just found the Elizabethan corset generator.  The fabric is really pretty in person, a fall floral pattern velvet, although I think it looks kind of gaudy and cheap in pictures.  It was part of an autumn fairy Halloween costume, which ended up being repeated a few times over the years in various incarnations.

What I like:

Once again, I made my own bias tape to finish the edges and to make the straps, and my application was lots better on this garment, since there weren’t so many curves.  The bias tape is made from a heavy synthetic fabric.  It is sort of satin-y, but I think it may have been meant to be a utility fabric, but I thought it went really well with the colors in the velvet.  I found the velvet at Joann’s and I bought half a yard because that was all I could afford at the time.  I had never seen anything like it and that was a huge part of the allure of this fabric.  I remember thinking it was sooo expensive at over $20/yard.

This actually fit pretty well considering it was probably the first pattern I had ever drafted, and I didn’t bother with a mock up.  I doubt I had ever heard of a mock up or muslin.  It didn’t pinch and it wasn’t uncomfortable.  The straps were even the right length.

Tuesday, April 19, 2011

Under the weather and unproductive

I spent most of the weekend feeling a bit under the weather.  I started altering some shirts for work, but then got bored and didn't finish.  I started on a petticoat for Dickens, but then a friend's post on facebook made me decide to redesign the project into something more versatile.  Sadly, the redesign will make it more expensive, so the project is going to go on the back burner for a while.  I think the end result will be worth it, but who knows when it will be done.


Sunday, April 17, 2011

What to do next

I'm not sure what I want to tackle next.  It seems like it might be a good idea to start on a second pair of jeans, snce right now it is all fresh in my head, but I also need a pair of slacks and I have that pretty blue pinstripe.  I also found a couple of shirt patterns that I had forgotten I had bought.


I really like the lines of the short sleeve version of this top.  A lot of the versions are more than a bit fussy, but I like the lacing detail on the back.


This pattern is a lot like a shirt I have, that I really love except it doesn't quite fit like it should.  My store bought version is too short in the bust, so the gathers hit a bit high on me. 
I would definitely have to alter the button placket, since I don't like that split look at the bottom.

What do you think?  Jeans?  Slacks?  A shirt? Something else entirely?

In non-sewing news of the day, Saturday was bath day for my cats.  Neither of them are happy.


I seem to have developed an allergy to Ferret, the white and grey one, and I am hoping that regular bathing will make it so I can pet her without itching for hours afterwards.


Saturday, April 16, 2011

Jeans wrap-up


Finally, here are some pictures of the completed jeans
 
 Taken in the office parking lot

After wearing them for a day, here is my wrap up.  These are really comfortable.  I love the color and I think the light blue topstitching looks really good.  The denim relaxed more than I expected it to throughout the day, so really I could have taken these in a half inch on each side through the hips and thighs, but the calves could have stood being a touch wider.  I tend to wear knee high socks because I get cold and the jeans are getting stuck to the socks and riding up a bit.  Not a huge deal, but a bit annoying to have to pull the hem down every once in a while.  The side seams are farther back that I would like and have a tendency to rotate towards the back.  I think the rotation is a function of the way I walk.  If it were a grain problem I think they would both be rotating either clockwise or counter clockwise, unless I made the pattern pieces off grain, which I’m pretty sure I didn’t. The waist band is a bit bulky, I should have trimmed my seam allowances closer, and I should have put the button hole for the fly closer to the edge of the waist band.  I set it back a bit too much because I was worried my machine wouldn’t be able to handle the extra bulk at the edge.  None of these things really detracts from these being cute and casual jeans.

The only big criticisms I have are:
1) I didn’t making the pocket facing wide enough, so it has a tendency to flip out of the pocket.  This is really annoying and just looks really bad in my opinion.  I think if I buy some rivets and put a rivet at the top of the pocket, this problem will be partially mitigated by the extra support, but next time I need to cut the facing wider.
2) I didn’t cut the pocket bags wide enough. It looks less that awesome on the inside, and I think if they were actually wide enough it would help stop the facings from poking out.
3) I forgot to fully removing some of my basting that had been cut out, so I have some little threads sticking out along the side seams.  I don’t know if anyone else will notice, but I do.

This was a fun project.  I learned a lot and came out with a pretty nifty garment.  I don’t think I am going to fade these, since as they are I feel pretty comfortable wearing these to work. 

Friday, April 15, 2011

Stage Fright?


My plan is to wear my new jeans to work today.  I’ve never worn something I made to the office, and I am a bit nervous about it.  What if they look ‘homemade’ in a My Mom Made My Clothes  sort of way?  What if, for the first time ever, something I made just falls apart?  What if, despite prewashing the fabric, the color starts rubbing off on everything and I leave a blue trail on everything I touch?  Let’s try to be rational here.  If I can make a corset that can give me an almost 6 inch reduction and not fall apart, I should be able to make a stable pair of jeans.  


Really, I am just nervous about opening myself up for criticism.  Lots of my coworkers already think I am a bit odd, although not necessarily in a bad way.  I did tell everyone when I took that fire spinning class.  Sewing your own clothes is a bit of an oddball hobby these days.  I don’t think anything calls these out as being handmade, and I need to get used to the idea since I am planning on making myself some slacks and a shirt or two for work.  


In sewing related news, I am totally lusting after this pattern from Wearing History .  Sadly, I don’t know that I can fit it into my budget just now, but hopefully before summer.  I think the outfit would be adorable at the beach, and the skirt would also make great office wear.  I also love the bathing suit in this vintagepattern , but of course it has already sold.


Wednesday, April 13, 2011

The jeans are done!


I have been spending pretty much all of my spare time on these jeans, and I haven’t taken any construction pictures.  I meant o, I really did, but never quite got around to it, since it mean having to stop what I was doing.  I did most of the construction on Saturday.  My best friend wanted to have a sewing day, so I started at home and then packed up the project and my sewing machine and headed to her house.  It was lots of fun.  We listened to the Star Wars Trilogy in the background, ate cookies, made jokes, and even got a fair amount of sewing done.  By the time I left I had the front and back constructed, most of the fitting done, and everything basted together.  By the time I left I was so tired of fitting.  It is necessary, but I find it so boring.  It is like trying on clothes while shopping, I can only take so much, and then I am done.  I ended up having to take in the side seams a lot more than I expected, especially considering the comparative lack of stretch in the denim I was using.  At this point the fit seems to be pretty close to perfect, but I want to wear them for a bit to see if any issues develop. 

I sewed on the tiny watch/ticket pocket before I did my fitting, and almost ended up losing the pocket.  The side seam is actually a bit farther back that I would like, because I didn't want to lose the cute little pocket.

The pockets ended up turning out really well.  They aren't perfect, but they look really good.


I am going to wear them on Friday and will post action shots then, assuming I get around to actually taking pictures. 

Of pom poms and apartments


This post has pretty much nothing to do with sewing.

Almost a year ago, B and I moved out of a space that we really loved.  It was a converted warehouse space.  The first time I visited it, when we had only been on one date, I thought, “This is where I want to live when I grow up.”  At the time I was also living in a converted warehouse, but mine was not nearly so colorful, and came with roommates.  The space was huge, weird, colorful, and sparkly.  It was so very us.  Sort of a human habitrail and with all sorts of places for the cats to hide.  A bit later I was living in our awesome warehouse and it was great, except that it was more than 70 miles from my office.  I put up with the commute for as long as I could, and then finally we just had to move.  Spending 3-4 hours a day commuting via BART and carpool was leaving me exhausted.

So, we made the grown up decision and moved to a regular, white wall, beige carpet apartment.  Our place is nice.  It is roomy and we have a little enclosed patio which is very nice for the cats and for BBQing, but it was so different from what we were used to.  The ceilings were so low and the rooms didn’t have any personality of their own.  On the other hand, we had heat and a ceiling that didn’t leak for the first time in years, so it certainly was far from being all bad.
This garland was the first thing I did in the new place that made it start to feel like home.  It is just a pack of assorted colors and sizes of pom poms and some fishing line, but it adds so much color.  Arranged on the mirror it reminds me of solar system models.  B has since added the many strands of lights, and put up some disco balls, and the living room now feels very much more “us.”

Tuesday, April 12, 2011

seam rippers

Over the weekend I bought myself a new seam ripper.  Not because mine was dull or worn out, but because I had lost it.  For some reason I can’t seem to hold on to a seam ripper for more than a project or two.  They just disappear, and then I revert to using a sewing pin and a pair of embroider scissors to rip out stitches.  With all of the basting and ripping I did on the jeans, I found myself wishing very strongly for a seam ripper, so I gave in and bought the cheapest one I could find.

I know it will only be around for a month… maybe two.

Is there anything you constantly have to replace because you just can't seem to hold onto it?  I suppose there must be a seam ripper graveyard somewhere in my apartment...

Monday, April 11, 2011

Quick & Dirty Tutorial: Fur Pom Poms

My cousin gave me the cutest knit cap for Christmas. A knit kitty hat with black tassels hanging from each side. It seems like tassels and pom poms are showing up all over the place in the stores recently, and I am particularly enamored with fur pom poms. My boyfriend asked me last week if I knew where to get them, and I had no idea, so I decided to pull out some scrap fur and experiment, and I got something usable on my first try! The only difference between the method below and my first try is that I realized that sometimes the pom pom needs a bit of stuffing to round it out. These are adorable, cheap, and super easy to make!


What you need:
Fur (You can find faux fur at most fabric stores, or you can sacrifice a teddy bear)
Some strong thread or embroidery floss in a color that blends into your fur
A tiny bit of stuffing (either fiber fill or a cotton ball or two)
Needle
Scissors


A note on thread choice: I used 3 strands of black embroidery floss. I used black so you can see it clearly in the photos, but you should try to use something that blends into either your fur or whatever you plan to sew your pom pom to. I wouldn't recommend using all-purpose thread for this, since just one line of stitches is holding the pom pom together.


1) Cut a 3 1/2" square from your fur. When you cut fur it is important to cut just the backing and not the pile, AKA the furry bit, especially if it is very plush or long. I think short skinny scissors like the ones in the picture or little embroidery scissors make this easier.

2) Snip the corners off of the square. Don't forget to just cut the backing, not the pile.

3) Start a running stitch on the right side of your fur, about 1/2" from the edge of your fur. Run the stitch all the way around the circle, making sure to end on the right side.

4)Start pulling the ends of your threads, so the fur begins to close up line a drawstring bag. Use your fingers to tuck the raw ends into the pom pom, and then pull it closed. Don't knot anything yet!

5) Look at your pom pom. Does it look full and happy or shriveled and emaciated? If you used a realy plush fur, it is likely that you pom pom will be nice and round thanks to the stuffing supplied by the raw edges of the fur fabric, but if you used a shorter fur, you should add some stuffing. Just loosen the threads and shove a bit of stuffing in there. Mine took a jumbo cotton ball's worth of fiberfill.

6) Pull the ends of the thread tight and use a square knot to keep it closed.
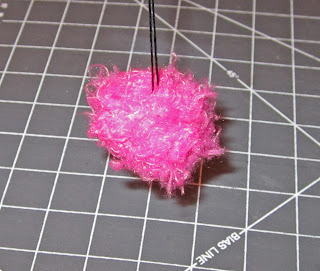
7) Use the ends of your thread to sew or tie your new pom pom to anything you like!

Sunday, April 10, 2011

So close and yet so far
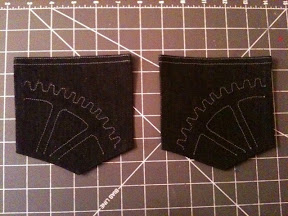

I got a lot done today. The jeans are fitted, the fly is in. I just need to add the waistband, sew on the back pockets, add the button, and hem. I think the gear embroidery turned out great. I can't wait to see everything together, but I don't know if I will get much sewing done tomorrow.  Maybe Monday.

Saturday, April 9, 2011

The pieces are cut


I just finished cutting out the pieces for my jeans.  Most of them, at least.  I want to have a contour waistband, so I want to wait until I decide exactly where these jeans will sit before cutting it.  Also, I haven't cut the back pockets because I am lazy.

In related news, I sat on my foot too long while cutting the pieces and I have a horrendous cramp in my foot.  Ow.

Friday, April 8, 2011

More denim ruminations


Please excuse the bad photos. They were taken with my phone in my cube at work...

I haven’t done anything sewing related in a couple of days. I received the denim for my jeans yesterday. It isn’t quite as stretchy as I expected, but I love the color. The buttons I ordered are even cooler in person than they were on the website, but I have no idea what I will use them for. If only they were less expensive! The blue pinstripe will hopefully end up being a pair of slacks and maybe a skirt.

Today, while I am at work, B is being awesome and prewashing and drying it for me. Tonight I am going to cut out the pieces with a very generous seam allowance, so I can hopefully start construction tomorrow morning. I have been reading and rereading this zipper fly tutorial at Stitches and Seams, trying to figure it out. I think I get it, but I will find out when I actually attempt it.

I want to embroider the back pockets, because that is a detail that I love in RTW. At this point I am leaning towards a minimalist, lines-only, embroidery of a couple of gears. In my head I see it as about 1/4 of a large gear with a smaller gear. I am very much in a steampunk phase right now, which I worry may be pushing me in a bad direction. I really like the idea but I can't seem to put it on paper yet.

All week I have been examining people's jeans. What do I think about the pocket placement on her's? The topstitching on his? It helped me to realize something. I actually like the fading details that they put on commercial jeans now. I’m not especially fond of crotch whiskers, but I do like a bit of fading on the front of the thighs. I’m not entirely sure how to get this look, though. Spray on some bleach? Sponge on the bleach? Hand held sander? I think all three would work, but which is more reliable? It would be annoying to go to all the work, make a great looking pair of jeans, and then make them look as though they had contract some catastrophic denim disease in trying to fade them. What do you think? What would you do?